Showing posts with label orange. Show all posts

Monday, April 4, 2011

Rainbow Tiger Stripes

Hey guys! Ok, so it's been a while since my last update. I got a couple spring themed manicures in the making, but how about a nice rainbow for now?

Well... rainbow tiger stripes. ;)


Totally reminds me of Lisa Frank! lol :D


Sunday, March 20, 2011

MARCH MADNESS!!! (Basketball Manicure)

Ok, so I'm not really much of a sports fan, but I make an exception for men's college basketball. I looooove Syracuse! I'm actually watching the Syracuse vs. Marquette game in the 3rd round of the NCAA's as I'm typing. :)

So in honor of my favorite sports team, I just got done painting some basketballs on my nails!


Great thing about this manicure is that it is FANTASTIC for short nails! I actually think this is one of those manicures that actually looks better on short, broad nails than on long nails.

Anyway, that's it for me. There's about 11 more minutes in the game, so I'm outta here!

LET'S GO ORANGE! LET'S GO!!!

Saturday, January 29, 2011

60's Inspired Nails

So my nails are finally starting to get long again! Yay! I'm starting on some Valentine's Day designs so look for them next month. In the meantime, here's a really fast and easy design. :)


I LOVE golden oldies; 1960's music rocks! My favorite oldies song is California Dreamin' by The Mamas And The Papas. Last year at school I'd put on some oldies while doing my art assignments and I was inspired to try some 60's colored nails.


I started off with a pea green base. Next, I added some pink, white and orange polka dots and be sure to make them fairly large because you'll need some room!


Once you have your polka dots dry, take the green polish again and put a small dot inside each of the polka dots. This makes your polka dots look like groovy little circles!


Let your nails dry and paint a top coat over it. It'll help even out your nail polish if you made your green dots too thick like I did. Ooops! :)

Monday, January 17, 2011

Blast from the Past! - Guest Manicures

Oops! Well, I've had these ones stored on my computer for a while... These are from back around the time I was going back and forth to Boston. When my mom and I would go, we would stay with my cousin who live near to Boston. She has three girls, all around the tween age, and every time we'd go down, I'd have to do their nails. :D

So these three manicures are theirs from the last time I went down. They browsed around my website and picked one out that they wanted.

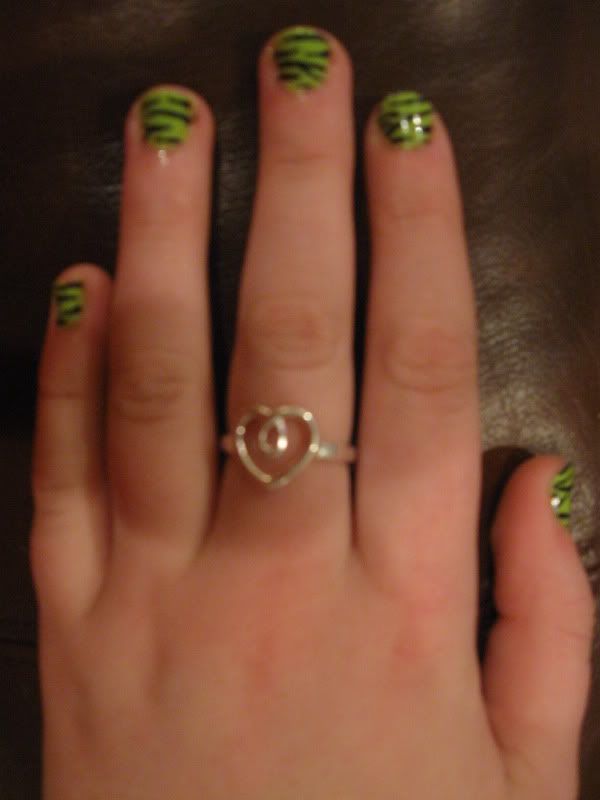
The oldest, Lexi, wanted a lime green zebra print. I think this one turned out to be my favorite. :)


Chase wanted the frog manicure that I did, except with a few creative changes. She decided to have blue frogs instead. :)


Then finally, Eavery wanted the tropical sunset that I did for a pedicure. And if I remember correctly, I also used my glittery glow-in-the-dark polish. :)


Friday, November 12, 2010

TWLOHA Manicure

Today is the To Write Lover On Her Arms day on Facebook! This organization does wonderful work, so to show my support, today's manicure is dedicated to TWLOHA! I decided to paint awareness ribbons in the four colors they represent.


I also made a quick little video, so take a look!


Friday, November 5, 2010

Vertical Stripes (Manicure & Pedicures)

So for this post, I decided to feature some striped manicures and pedicures I've done recently. They are a super easy design to do. You can use sharpie, nail art pens, brushes, toothpicks and even the nail polish's brush. It's great for everyday wear and there are so many color possibilities! Also, one of the best things about vertical stripes is that they are great for short, broad nails. They give the illusion that your nails are longer and slimmer than they actually are! This also makes stripes great for pedicures, too. :)


I love black paired with bright colors. So for this manicure I used a black base coat with bright green, pink and yellow stripes. With the contrast against the black, the stripes really popped! They almost looked neon. :)


(sorry about the sideways picture! I couldn't orient it right for some reason...)

For this pedicure, I decided to go monochromatic. I think this was my favorite and most successful striped design. I used a light, medium and dark blue to do the stripes.


And then of course you can never go wrong with a good old fashioned rainbow! It looked great, and was very colorful!

I got a whole bunch of odds and ends to post this month, so look forward to a random November!

Sunday, October 31, 2010

Glow-in-the-Dark Spiderweb & Jack-o-Lantern Manicures

Well, I did a FANTASTIC The Nightmare Before Christmas themed video tutorial. Bad news is that my Windows Movie Maker keeps freezing up at 42% when I go to publish it. Ugh! Anyone know how to fix this?

Until then, I'll have to save that manicure for later. It's not in time for Halloween, but TNBC is fun any time of the year. So to make up for that and the lack of Halloween manicures, I have a double feature for you today! Here are two similar glow-in-the-dark Halloween manicures!

I decided to go with Jack-o-lanterns this year for Halloween. Very simple to do and they look fun! All you need is orange nail polish and a black sharpie or nail art pen.


(excuse the smudges)!!!

Build up a few layers of orange polish so it's nice and opaque. The draw on the little faces. Be creative! It's great practice for when you go to carve your own pumpkins! ;)

But, that's not all! These pumpkins also glow!!! I couldn't get a very good picture of the glowing, and my glow-in-the-dark polish was a little off this year. I think it's time to get a new one. :/


If you want your nails to glow and still be able to see the faces, you need to paint a glow layer after your orange and BEFORE you draw in the faces. This way your design will be on top and you can see it, even in the dark!

Last year I did a similar manicure. Instead, I used white nail polish and a spiderweb design. The principle is still the same though, draw on your design after you put a glow layer down. You can really use any color and any design you'd like! I, personally, think a bat would look awesome... ;)


Good news is that these two manicures work well on short nails, especially the pumpkin one (I dare to say I prefer it)! So fear not short nailed gals, you can rock nail art just as well! :D

So let's end on that note. Happy Halloween to everyone! Stay safe!

Wednesday, October 13, 2010

Orange Spiderweb Pedicure

Just a quick little update here, just to put out some ideas... I've got another little Halloween design for you! Basically it's a french manicure, but orange and black. Then I added a couple cute little spiderwebs to finish it all up. :)


I have another spiderweb design to show you later this month, but I might make it into a video tutorial. I think it's my favorite manicure I've ever done, so look forward to seeing that one! :)

Friday, September 24, 2010

Goodbye Summer (Tropical) Pedicure

Well, summer is over and we're heading into colder weather. Fall is my favorite season, but this summer was pretty nice for me, weather-wise anyway. So as a final goodbye to summer, I decided on a tropical pedicure.


This one was very difficult to photograph for some reason, my camera couldn't pick up the colors very easily. I did a gradient of pink, orange and yellow for the sunset background, with black palm trees and seagull silhouettes. It turned out as a nice, relaxing adios to summer.

I'm really looking forward to October though; it's my favorite month so expect lots of Halloween themed manicures coming from me! And as we get closer to Halloween, I'll share with you my all time favorite manicure I've ever done. :D

P.S. You may have noticed some minor changes... I flipped the layout sideways and added a label section so you can search posts by topic. I thought this might make searching older posts easier. ALSO! Please don't forget to vote in the poll! Still 15 days left! :)

Sunday, August 29, 2010

Sinful Colors Haul

I'm real tired, but I wanted to do something. So just a quick post:


My mom was out and about and wherever she was, there was a huge nail polish sale! So she came home with a pretty nice Sinful Colors haul! Super super cheap, and the colors are great! We've tried them all so far except the white, purple and opal colored ones.


The blue is peacock blueish, but in some lights, it turns a teal green. It's also pretty shear, along with the opal. The purple is really hard to photograph but it's a nice mid-toned purple. The hot pink and fuchsia are super super bright and pop very nicely. The dark red is perfect for a Christmas red and has a bit of a shimmer to it, but not too much. Then the black and white are just like any other black and white. :P

Sunday, July 25, 2010

Sally Hansen - Hard As Nail Xtreme Wear - Review

Ok, now I know I said I wasn't going to do reviews, but I have a bunch of these and I found this line pretty interesting...

Alright, so I'm reviewing a few colors in the Sally Hansen's Hard As Nail Xteme Wear line. First, let's start with the disclaimer: I have not paid for these products; they were given to me by my mother. I am not being paid in any sort of way for this review and this is my honest opinion.

Not all the colors have the same, so I can't speak for every color in the line, but after trying 6 of them, I think I can give a fair review.


ALL of the polishes started off super watery. The brush isn't very good either and doesn't hold the polish, so you'll make a huge mess if you're not careful! After your first or second try, they level out to the consistency of normal polish.

That is, except the white. The white just sucks. It thicken up super fast and it's now like painting with paste. I've thinned it out twice already and it's started getting thick again. The white also looks flat like white out, so unless you like that sort of thing, I would NOT recommend the white. HOWEVER, it's very pigment and is the right consistency for a Konad. It's a perfect, cheap alternative.

The yellow and orange are super shear, so you'll need 5+ coats to get bottle color. Either that or layer it on top of a white coat. I suppose you could also try layering it ontop of another color if you want to experiment.

The green is nice, but it's starting to thicken up like the white, though not as quickly. It's pretty pigmented, opaque in thin 2 coats.

Marine Scene is really good, it reminds me of a peacock blue. It's a frosted with a little shimmer in there. It takes maybe 3 or 4 coats to be opaque, but it's wearable after 2. It's also great to layer on top of another color. I have a frosted green and I put a coat of this over it and it looks gorgeous!

And the best of the bunch is Blue Me Away... it really did blow me away! I have never been so impressed with a nail polish before! It was opaque in 1 coat, is pretty chip resistant, and super cheap! And I just LOVE the color! It looks great on cool skin tones and really jumps out! The only downside to this polish is that when you try to remove it with polish remover, it stains your fingers blue for a few hours. Otherwise, I think it's a great bang for your buck and I would definitely recommend this color! In fact I better go out and get another bottle soon! :D

Overall, they aren't a fantastic nail polish but not bad either. The bottles are small, BUT they are VERY cheap, ($2.50-$3.50ish at walmart and drugstores) so I think they are well worth a try! The color selection is also very good and they have some very unique shades. There aren't very many nudes or skin tones, so this is a line for a girl who loves color!!!